Do you know that making a DIY lawn sprinkler at home is possible? I’m sure most of you were unaware of this fact. However, I am not talking about the water bottle hack to make a simple sprinkler. Indeed, it’s possible to make a professional-grade automatic sprinkler at home.
Most of you must be afraid about its cost when it comes to the sprinkler system for a lawn. And no doubt that a sprinkler system is very much expensive. That’s why many lawn owners don’t have one, and that’s a big problem for their lawns.
However, when you can make it home, why deprive the lawn of getting water the right way? Don’t you believe me? If not, just check out this article to learn how easily you can make your own homemade lawn sprinkler. And I can guarantee that this DIY sprinkler would be a couple of times cheaper than the store-bought one. Well, let’s start with a list of the tools you will need.
Tools You Will Need to Make A DIY Lawn Sprinkler

- An above-ground anti-siphon valve.
- Sprinkler timer.
- PVC pipe (according to the length of the system).
- Manifold if you will make a multi-zone lawn sprinkler.
- Sprinkler heads.
- Sprinkler head riser.
- Duct tape.
- Necessary screws.
All these sprinkler tools are available in the market. You don’t have to buy them in a set. Just buy them one by one from any hardware shop. These tools are available loosely in the market for a reason. When the sprinkler system breaks, changing the entire system is troublesome and costly. So, people buy specific parts that are broken and then fix that part only.
Process of Installing A DIY Lawn Sprinkler
When you have gathered all the essential tools, you have to be prepared to start making your sprinkler. Remember that the process is complicated, and you must follow a plan. And also, it’s not a mere sprinkler; if you make it perfect, it will work for years.
However, the entire process is long, so we have divided it into a few steps. Make sure to follow the steps sequentially.
Step 1: Collect Data on Your Available Water Source
Before buying the tools, you must measure some things about the existing water supply. Such as the water pressure of the source in PSI, measurement of the service line, pertinent data on a good pump, and water meter, whichever is available. Another important piece of information you must fetch is the water flow rate per minute according to your standard unit.
Step 2: Making An Irrigation Map and Prepare for the Task

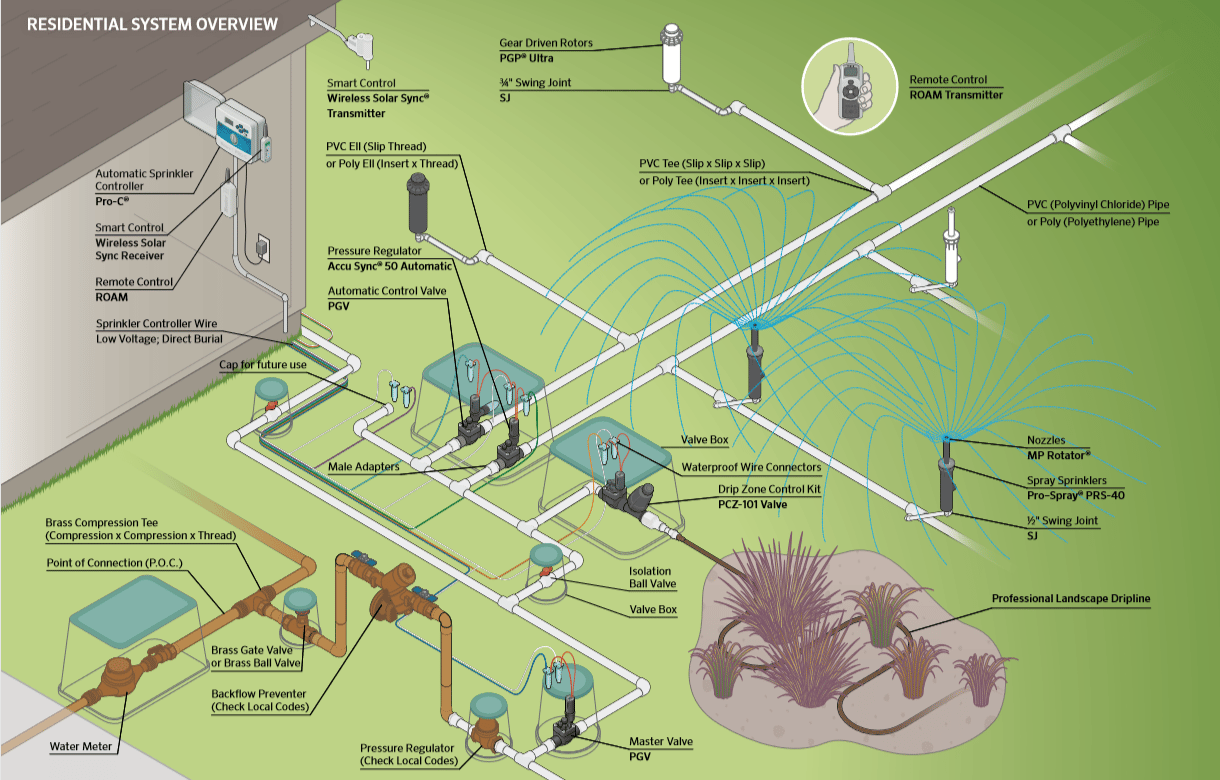
Now you must gather your supplies for the water system as per the required irrigation diagram. Some of the essential parts you have to include are; risers, high-quality PVC or metal pipes, sprinkler heads, valves for control, automatic timer, mechanical tool, etc. Now are almost ready to assemble your new sprinkler system.
Step 3: Apply Strings and Stakes and Make Trenches
Before digging any trenches for the pipes, mark the places as planned with stakes and strings. The markings should be clear and mistakes-free. You should connect the strings with the stakes, which are already placed, so they can set perfectly when you place the pipes for real.
Now it’s time to dig the trenches for the pipes and ensure you dig in the right direction. A good trench tends to be around 8 to 11 inches deep, while the width is around 4 to 5 inches. You should do this work on a sunny day.
Step 4: Attach the Water Pipes

Step 5: Connect to the Water Source

Make sure to connect all the PVC sprinkler pipes with the control valve you already installed. There are scopes to use multiple valves for water controlling to different levels as needed. So, you have the freedom to use several control valves to maintain water flow in different locations of your lawn and the whole yard.
Step 6: Connect the Risers and Clean the System Using a Sudden Flush of Water
It is time to add risers on each of the tee connections in the PVC pipe system. This is important for the proper implementation of the water sprinkler system.
Before adding the sprinklers, you must clean the whole piping system with fresh water. Any junk or debris sitting inside will eventually stick hard and hamper the water supply.
So, you must flush the system before hooking up the sprinklers. To do it properly, you should turn the water while the pipes are attracted. The water will flush out the remaining dirt and debris.
Step 7: Installation of the Sprinkler Heads and An Auto-timer

An automatic timer is very useful when it’s about watering lawns and gardens. Using a water-resistant pipe, you should wire an automatic timer with the control valve. If there are multiple valves, add more if required. This timer can schedule watering sessions at different times in the day or in particular areas that require more watering than others.
Step 8: Finally, Test the System and Cover the Pipes under the Soil
As discussed previously, if you have done everything properly, then it is time to check the water sprinkler system. You must thoroughly check whether there is any leak and if the water flow is well enough.
After verification, you can bury the pipes under the soil, as it seems it will work fine for at least a couple of years without any hiccups. I hope you have a great time with the new sprinkler system at home.
So, this is how you can make a professional-grade DIY lawn sprinkler at home. However, if you have a very small-sized lawn and you want to make it more easily, you should check out the next point.
DIY Lawn Sprinkler Under 10$

To make this sprinkler, you will need an empty plastic bottle, duct tape, a water pipe, connectors, and a fork. First, you have to put the fingers of the fork on fire to make it hot. Then, use it to make holes in the bottle. Try to make multiple holes around the wall of bottles. Next, use the connector to attach the pipe and the bottle. Finally, put the bottle on the lawn and connect the other side of the pipe to the water source.
Now, turn on the water source and see. But before that, make sure to use duct tape to cover the connector. Otherwise, the connector will break because of the water pressure. However, this kind of DIY sprinkler works perfectly with a high-pressure water source. It looks quite like the oscillating sprinkler.
Here, you only need to buy the pipe and the connector. And I am sure that they won’t cost more than 10$. But remember that this kind of hacking sprinkler cannot be the solution for long-term use. Eventually, the professional-grade solution I just finished talking about cannot be as that much long-lasting as well. You should go for a branded lawn sprinkler set for the best and long-term use.
FAQ
Q: Should I make a DIY lawn sprinkler?
A: If you cannot afford a sprinkler system for your lawn and it is big, you should definitely make a DIY lawn sprinkler at home. You can make it with at least half of the price of a branded sprinkler system. Indeed, it is efficient and easy to make. But it may not be long-lasting as a branded sprinkler system.
Q: Can I use PVC piles in the sprinkler system?
A: Yes, the sprinkler system can use both PVC and polyethylene pipe. Eventually, many branded sprinkler sets come with this kind of pipe. It would be best if you use new pipes from a popular brand.
Q: What do I need to make a DIY lawn sprinkler?
A: You will need the sprinkler head, sufficient PV pipes, sprinkler head risers, connectors, timer, etc, to make a DIY lawn sprinkler. Besides, you will need the basic mechanical toolkit to install a sprinkler on your lawn.
Q: Can I use a bottle sprinkler on the lawn?
A: Yes, you can use a bottle sprinkler on the lawn if it is small. You must need a sprinkler system for a big lawn. Also, you cannot rely on the bottle sprinkler as it can not provide security to work for long.
Q: What size pipe is perfect for the lawn sprinkler?
A: A pipe with 3/4 of an inch, which means 20 mm in diameter, is the perfect size pipe for a lawn sprinkler.
Final Thought
So, you can now make your own DIY lawn sprinkler at home. Before I forget, let me clear one thing here. We won’t suggest this kind of homemade sprinkler, especially if you don’t have experience in working with mechanical tools. Also, this type of sprinkler is only suitable for temporary use.
If you have your own home, we prefer to buy a sprinkler system and call the plumber to set it perfectly. And if you need it for only a few years, then trying this homemade lawn sprinkler seems good. But it is always better to buy a branded one for sure. Also, you should learn about the types of lawn sprinklers before you buy one.
Hopefully, you have got my point. Still, if you want to try a sprinkler on your own, let us know about the result. We love to hear from you, especially when you want to share your real experience with the lawn. Thank you for your time.
